Translated into English by Patricia Lima Carlos.
These devices are therefore used as light sources for signaling, lighting or data transmission. In Figure 1 we have the symbol adopted to represent this component, as well as the aspects of the main types found in practice.

To use an LED it is necessary to limit the current to a resistor or other external component. The typical voltage drop in a collapsing LED depends on the material and therefore on the color of the light typically ranging from 1.6 V for reds and infrared to 2.7 V for blue.
The LEDs must not be subjected to reverse voltages greater than 5 V as this may damage them. There are also LEDs called RGB that are actually formed by three LEDs in the colors red, green and blue connected in parallel as shown in Figure 2.
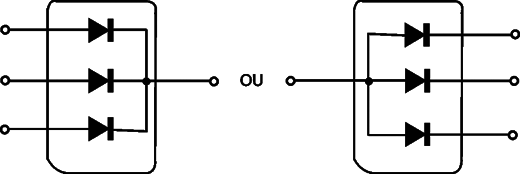
Many of these LEDs are not simply emitter elements that can be tested as independent diodes, but have driving circuits (constant current sources). For these LEDs the following procedures do not apply.
What to test
The proof of junction is the simplest but must be done with a tester which provides a voltage greater than that required for direct polarization, i.e., greater than 1.6 to 2.7 V, depending on the LED tested. The best way to test an LED is with a simple polarization circuit that emits light.
The multimeter only reveals if an LED is shorted, informing about any other problems which may occur.
Used Instruments
Continuity Test (within reservation)
Multimeter (partial test)
Test circuit (complete test)
Plotter of curves and oscilloscope
The Tests
1. Multimeter and Continuity Tester
This test only detects a LED in short, it does not indicate if it is open or with other problems. For the continuity tester it will be possible to perform a more complete test if your test voltage is greater than 3 V.
Procedure
a) Set the multimeter to a low resistor range (Ω x10 or Ω x100 if it is analog and zero it). If using a continuity tester in operating conditions.
b) Measure the forward and reverse resistance of the LED under test.
c) For the continuity tester test both ways, observing the LED if it is a visible light (not infrared).
The procedure for this test is shown in Figure 3.

The Interpretation of the Results
The resistance must be high in two directions or in one direction. If there is a way that the resistance is low, because the voltage is sufficient to bring the LED to the conduction, if it is a visible light, it will light up. If the resistance is high in both directions, we can say nothing about the state without a test circuit. However, if it is low in both directions, we can say that it is short.
For white LEDs or the ones having internal constant current sources it is possible that depending on the voltage applied by the tester it will light, but this does not always occur. If in the test, the LED does not light, it is best to check its status with the test circuit.
2. Test Circuit
A safer way of testing the visible light LEDs is with the simple test circuit of Figure 4.
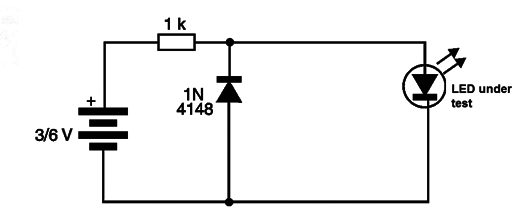
By connecting the LED to this circuit, it should light up. For the infrared LEDs, as we cannot see the emitted light, we recommend the specific test given in item 5 of this sequence. With this circuit we can also test the white and RGB LEDs which have internal circuits of current control.
3. Direct Voltage Measurement
Using the test circuit of Figure 4 we can use a common multimeter to determine the direct voltage that this LED requires to drive. Figure 5 shows how this can be done by remembering that a forward polarized LED can be used as a reference or voltage regulator, almost as accurately as a zener.
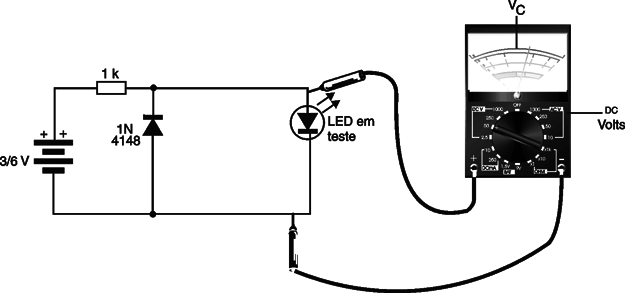
4. Using the Oscilloscope
In Figure 6 we show how to use the curve tracer to lift the characteristics of an LED, with the help of an oscilloscope. This circuit is similar to what we use to analyze diodes, since the LED is nothing more than a diode.
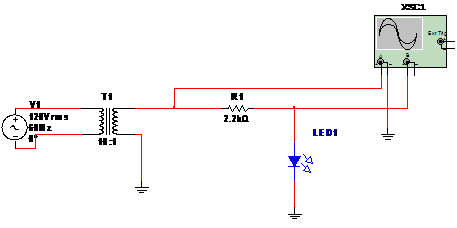

In figure 6 (a) we have the simulated circuit in Multisim Bluea and in the same figure in (b) the image obtained for a good LED. On the vertical axis we can measure the direct conduction voltage of the LED. The oscilloscope is set to external scanning (B / A, A / B or X / Y).
5. Infrared LED Test
The test of infrared LEDs can be done with a test circuit for the emitter and a detector circuit connected to a common multimeter. An infrared sensor (common photo-transistor) will acknowledge if radiation is produced and therefore the LED is in good condition. The complete circuit for this test is shown in Figure 7.
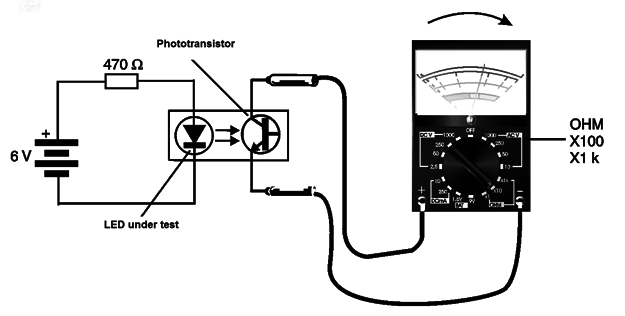
This simple circuit can be implemented easily using a contact matrix. Note that the LED being tested must be coupled to the phototransistor through a tube, as shown in Figure 8.
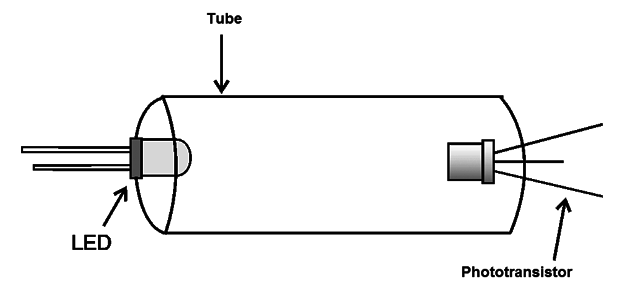
With the coupling indicated, it is guaranteed that the phototransistor will be driven only by the infrared radiation of the LED under test. Of course, because the phototransistor also responds to visible radiation, any type of LED can be tested in this circuit, and also (as we will see later), photo-transistors.
Comments
We remind you that white or RGB LEDs used in panels of various types of equipment are actually made up of 3 different color LED inserts (red, blue and green) whose light is combined to produce the desired colors, as shown by Figure 9.
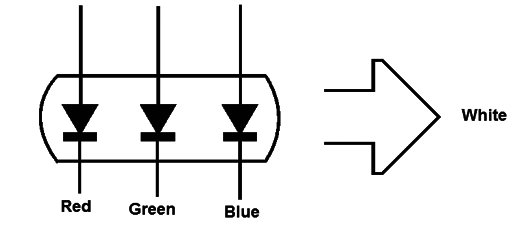
In LEDs where the terminals of the three internal emitters are accessible the test run can be done as if they were three independent LEDs. However, in cases where there is only one terminal it is necessary to consider that in some the chip not only from emitters but also contains more complex driver circuits that cannot be tested in a simple way. For these cases the test circuit is the most suitable, as it simulates the power supply of the LED under normal operating conditions.


